This slideshow will show you how to get credits to use premium models.
Method 1: Playing Projects
Playing five projects per day gives 100 credits per project! However, you have to play them for a few seconds to a few minutes.
Method 2: Daily Login
You get progressively more and more credits as you login for longer. You can also set reminders to use the site.
Method 3: Interaction
If people engage with your projects, you get credits. Telling people to like your project (possibly for a reward) can also increase engagement and therefore, increase credits.
Method 4: Sharing
Sharing links that get clicked gives you credits. Share your projects wherever.
(Bonus) Method 5: Frequent Updates
Frequently updating your projects makes them show up in New. It will give your projects more engagement. You can also use this to advertise other projects.
Thanks for reading!
I hope you can take information from this that you didn't already know and I hope you like and follow.
0. First Steps
Homepage and Starting a Project from a Blank Slate
When you first open Websim, you will be greeted by the homepage.
Here, you can browse existing projects by clicking on any of the thumbnails, or you can create your own project by opening up your sidebar.
On desktop, use:
On mobile devices, use:
Remixing/Forking
Remixing, also known as forking, is a main social feature of Websim. This allows you continue the work of any project you like, or share your ideas with the creator. Simply open your sidebar and start prompting within the project's edit tab, and when you send a prompt, you will create a sort of cloned remix of that project, which you can then iterate on further.
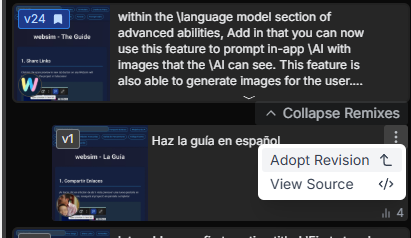
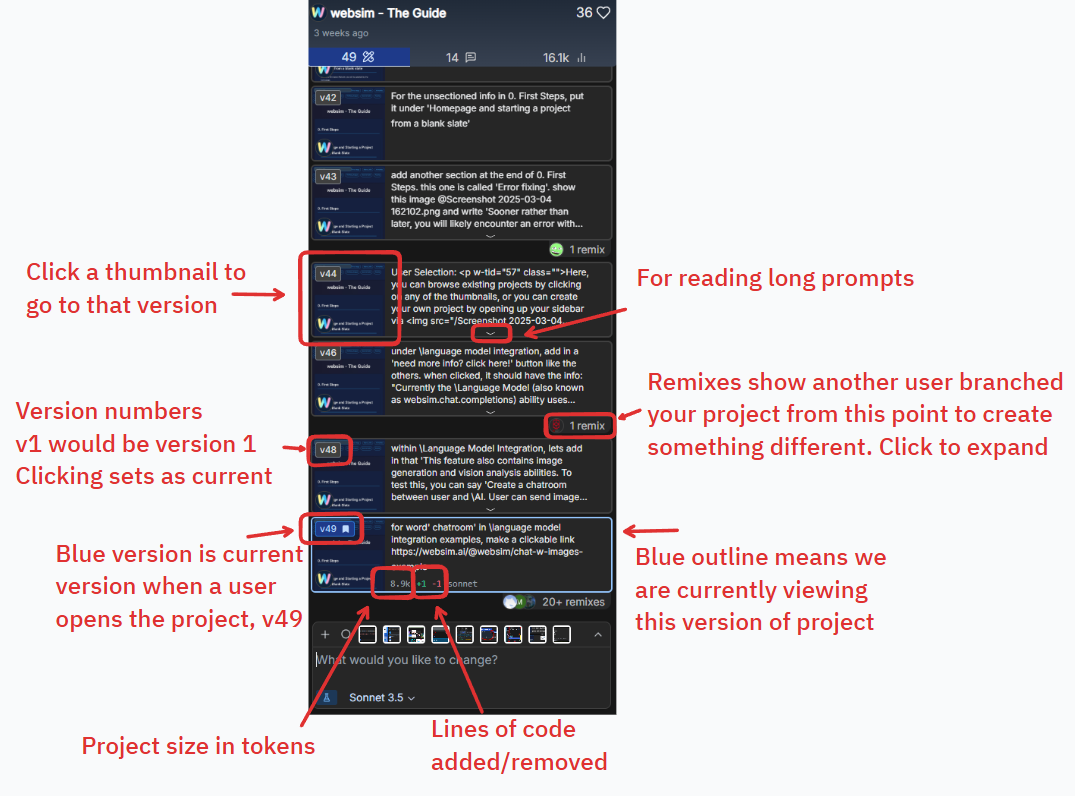
Adopting Revisions
In the sidebar history, you can see all remixes of your project, version by version. If another user remixes your project and you want to add that into your original project, simply open the remixes drop down in your sidebar, click the 3 dots icon on the desired remix and click 'Adopt Revision'.
Adopting a revision brings that version created by another user into your main project, allowing you to easily implement user feature addition like in the above screenshot example, the addition of a new language. While the project remains under your ownership, the version history will properly show credit to the creator who's revision was adopted, as shown in the following image.
Here you can see that while the project is owned by Websim, it adopted a revision by team member @maxbittker and the version history shows him as the author of the relevant version.
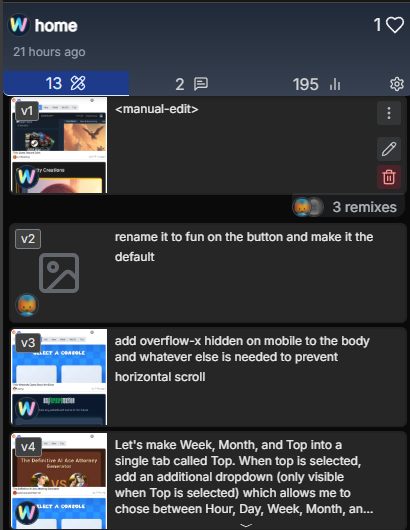
Versions
In your project's sidebar, you'll see a full history of your project with the ability to go back to any previous version, change which version set as your project's default when people open the project, and more. This feature can also be extremely helpful for debugging when a project breaks between iterations.
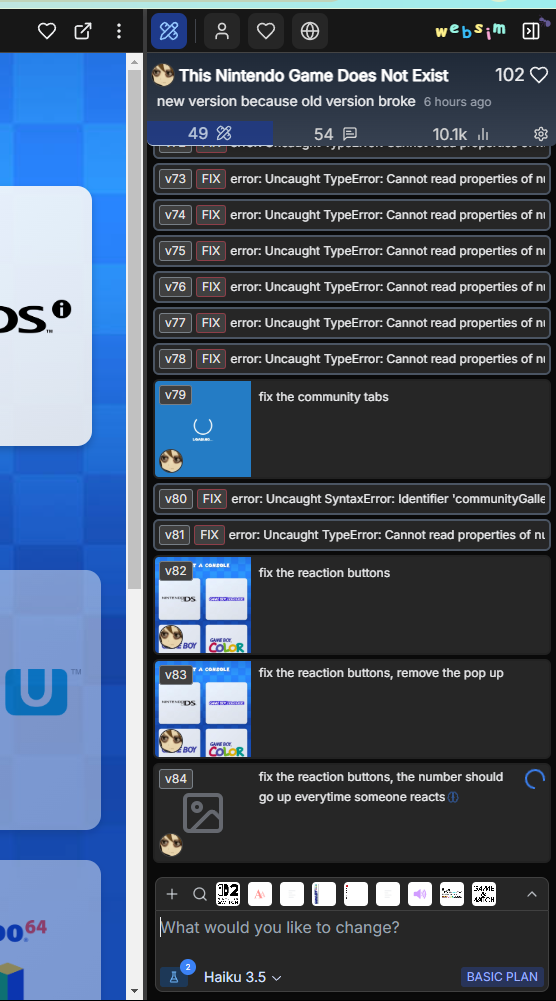
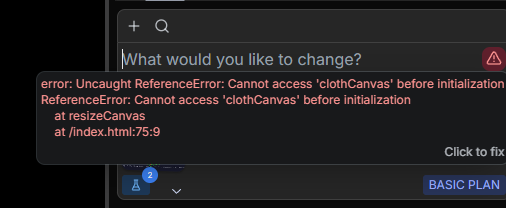
Error Fixing
Sooner rather than later, you will likely encounter an error with your project. Websim attempts to find fixable errors and warn you with the pictured red triangle icon. If you click on this button, websim will generate a prompt alongside using a unique path for generating your next version, hopefully with the error no longer present.
Occasionally, this auto-fixing method fails. In these cases, you may notice that the error is the same every time you click to fix, or that it otherwise never ends up fixing the specified error. In these cases, the most ideal course is to go back to a working version and try a new prompt, or a different model.
1. Share Links
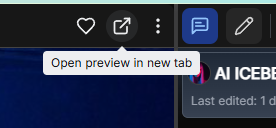
Clicking the open preview in new tab button on any Websim will navigate you to the project in fullscreen!
Profiles have share links as well - Take a look at https://j17.on.websim.ai to see an example. Just open the preview in new tab button while on a profile page, or put your username before .on.websim.ai/ to start sharing your full screen profile off-site
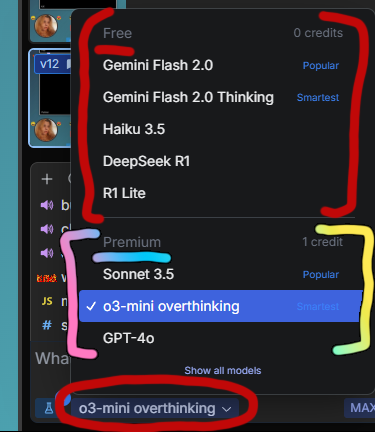
2. Selecting your AI model
Websim uses state of the art AI models by companies such as OpenAI, Anthropic, Deepseek, Google Gemini and more. In order to change which model you are using to code your project, click on the dropdown menu in your prompt bar.
Models at the top of the list are in our free category, while models under the premium category are still available to all users, but cost 1 credit per run.
New models are released regularly so this list will change over time.
3. Credits and Plans
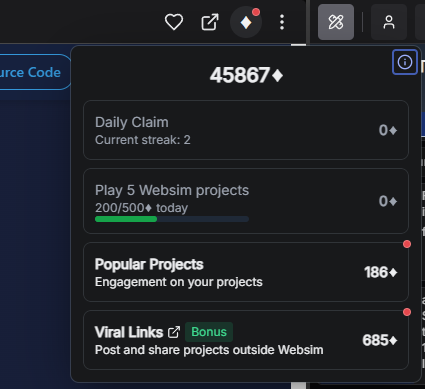
Running Websim and especially the AI models is expensive. For this, we have a system of credits to balance usage rates.
As shown above, users can earn credits by completing various quests and achievements in the credits menu. These include daily streaks, playing other users' projects, and having your own projects become popular.
To see a breakdown of our current subscription plans, please visit https://websim.ai/plan.
Creator Program: Active creators can apply for a sponsored plan through our Creator Program. This program supports developers who regularly contribute quality content to the Websim community.
4. Advanced Abilities
4.1 Language Model Integration
The Language Model ability allows your websim to generate AI responses dynamically without creating a new page. This enables interactive AI features within your existing page.
This feature also contains image generation and vision analysis abilities. You can create chatrooms where users can send images for AI analysis, and receive generated images in response.
Example: Check out this Theme Generator where clicking a button triggers an AI response to change the site's theme. The prompt used was "use ai to make a button that changes the theme of the site randomly".
Example: Try creating a chatroom with the prompt "Create a chatroom between user and AI. User can send images for the AI to analyze visually, and respond with a relevant generated image in kind."
Tip: When using the Language Model ability, you can specify exactly how you want the AI to format its response, making it perfect for generating structured content like themes, stories, or game elements.
Need more info? Click here
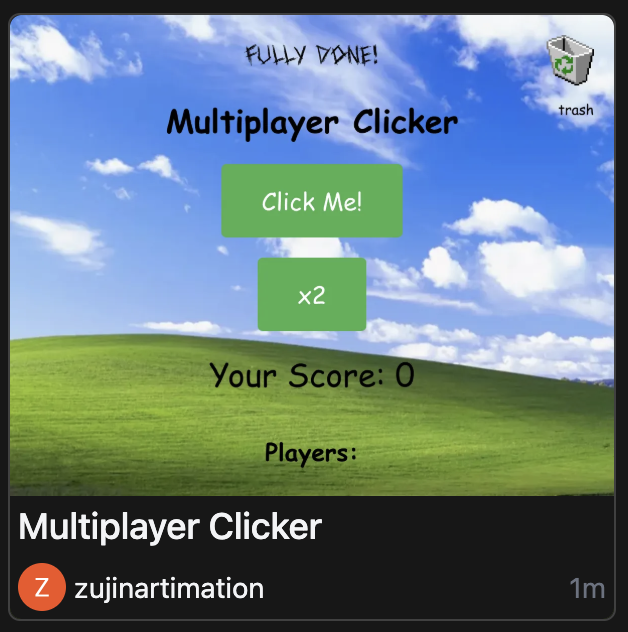
4.2 Multiplayer Capabilities
The Multiplayer ability enables real-time interaction between users in your websim. It can be used for chat rooms, collaborative tools, or persistent data storage for forums and social features.
Example: Try this Multiplayer Chat Room to see real-time interaction in action. The prompt used was simply "make me a multiplayer chatroom".
Tip: Multiplayer is perfect for creating social features like chat rooms, collaborative editors, or real-time games.
Need more info? Click here
4.3 Metadata API
The Metadata API ability allows your websim to access user data like avatars, likes, and projects. It's activated by including 'profile' or 'metadata' in your prompt.
Example: Here's a Custom Profile Page created with the prompt "make a profile page for kat".
Tip: This ability is essential for creating personalized user experiences and custom profile pages.
Note: To! set this page as your account's profile page, go to the sidebar, click the gear icon and set the URL to 'profile'.
Need more info? Click here
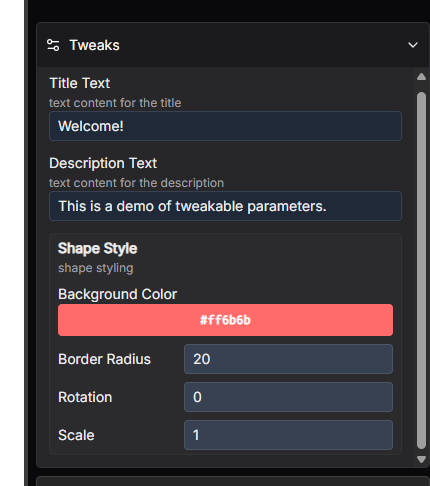
4.4 Tweaks
Tweaks is a feature that allows users to easily modify variables within their code through a user-friendly interface, without needing to understand or edit the code directly.
To use tweaks, enable them before sending your prompt. Once enabled, you can open your sidebar to see a panel of easily adjustable parameters for your project.
The tweaks panel provides intuitive controls for modifying various aspects of your project, such as colors, text content, dimensions, and other numerical values that affect your project's appearance or behavior.
Tip: Tweaks are particularly useful for fine-tuning visual elements and testing different configurations without having to regenerate the entire project.
5. Thinking Output
Some models are able to use reasoning abilities to plan out their actions. Clicking this brain icon will allow you to see the thinking output.
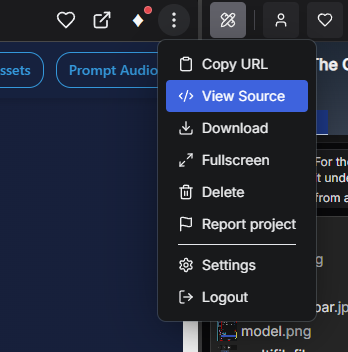
6. Source Code
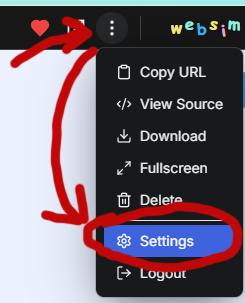
You can access your project's source code by clicking the 3 dots menu and clicking "View Source".
In the view source window, you may see a numerical count of 'Tokens'. This refers to how AI models measure the amount of computation power a project takes to iterate on.
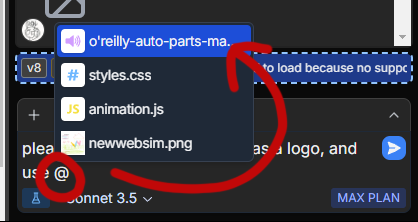
Pro Tip: You can reference files in multifile by typing @ in your prompt. For example, "@styles.css needs a dark mode theme" would update your CSS file specifically.
7. Assets
You can add your own assets to websim projects by using the plus icon:
The plus icon allows you to upload your own files (tons of filetypes are supported!), or use the magnifying glass icon to access the asset browser. When an asset is uploaded to Websim and passes automated content moderation checks, it is then automatically added to the global Asset Browser.
The asset browser contains numerous user-uploaded images, audio files, and 3D models. Add assets by clicking the blue plus icon in the corner of each item.
Using Assets: When you add assets, your project enters a 'draft' state. To use these assets, type @ in your prompt to see a list of available assets. Select an asset and specify how to use it, like "use @background.mp3 for the background music". Sending the prompt will return your project to normal state.
Files in multifile are also treated as assets, and can be referred to using this @ method as well. See the multifile section for an example!
8. Changing Prompt Audio
You are now able to set a custom sound for the audio that plays when you finish a prompt! To do so, start with navigating to your settings menu by tapping the 3 dots menu in the top right of Websim.
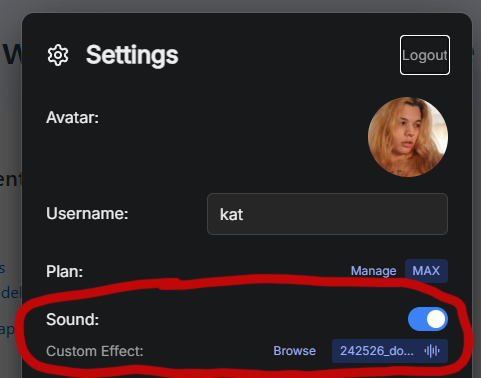
Next, you will want to find the setting titled 'Sound' and beneath it, 'Custom Effect.' To change your sound effect, click 'Browse'.
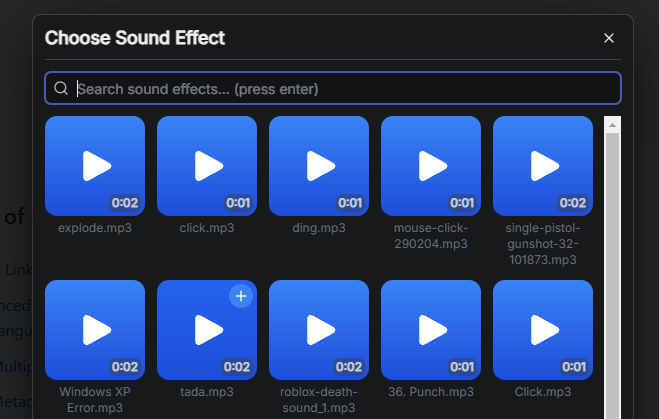
This will take you to the Sound Effects (SFX) section of the Websim Asset Browser. Here, you can preview any sound and select it as your custom prompt completed sound effect.
How to Use WebSim for Beginners
Welcome to WebSim, the interactive simulation platform that allows you to explore the boundless possibilities of an alternative internet. This beginner's guide will help you get started with structuring your requests and navigating the WebSim experience.
Understanding the Basic Structure
When using WebSim, you will be providing URLs that serve as prompts for the system to generate simulated websites. These URLs can be as simple or as complex as you like, depending on the level of detail you wish to convey.
The basic structure of a WebSim URL looks like this:
https://websim.ai/path/to/simulated/website
Adding Parameters
You can enhance your requests by adding parameters to the URL. Parameters allow you to provide additional context or instructions for the system to consider when generating the simulated website.
Parameters are added to the URL as query strings, following the ? symbol. Multiple parameters can be chained together using the & symbol.
theme=: Specify a theme or genre for the simulated website (e.g., theme=cyberpunk)
purpose=: Describe the purpose or intent of the simulated website (e.g., purpose=ecommerce)
target=: Specify the intended audience or target market (e.g., target=teenagers)
setting=: Provide a specific setting or context for the simulated website (e.g., setting=post-apocalyptic)
Feel free to experiment with different combinations of parameters to see how they influence the generated websites.
Step-by-Step Instructions
Here's a step-by-step guide to get you started with WebSim:
Think of an idea for a simulated website you'd like to explore.
Construct the base URL using the https://websim.ai/ format, followed by a path that represents your idea (e.g., https://websim.ai/virtual-classroom).
Optionally, add parameters to the URL to provide additional context or instructions (e.g., https://websim.ai/virtual-classroom?theme=futuristic&purpose=education).
If desired, add plugins to your simulated website by appending the plugin parameter followed by the unique identifier of the plugin page (e.g., https://websim.ai/virtual-classroom?theme=futuristic&purpose=education&plugin=plugin-id).
Submit your URL to WebSim, and the system will generate a simulated website based on your input, integrating any specified plugins.
Explore the generated website, following the links and navigating through the simulated content.
If you want to explore a different idea or add/remove plugins, simply modify the URL accordingly, and WebSim will generate a new simulated website based on your changes.
Using WebSim Plugins
WebSim also offers a powerful plugin feature that allows you to enhance your simulated websites by integrating additional functionality or content. A plugin is essentially another simulated website that you can embed within your current WebSim page.
To add a plugin to your WebSim page, you need to use the plugin parameter in the URL. Here's how it works:
Identify the unique identifier of the WebSim page you want to add as a plugin. This identifier is the string that appears after /c/ in the URL of the desired page.
Append the plugin parameter to your current WebSim URL, followed by the unique identifier of the plugin page.
For example:
https://websim.ai/c/lyIIJIEemsdt7wnJC
To add this page as a plugin to your current WebSim page, you would modify the URL as follows:
Plugins provide a way of injecting scripts / elements from one WebSim to another.
Please note that specifying plugins in the real URL is a temporary measure just to get people started prototyping. We're still figuring out a more integrated UX for managing plugins.
Experimental WebSim API
We are excited to introduce the experimental WebSim API, which opens up new possibilities for creating and manipulating simulated websites within WebSim itself!
All WebSim pages and plugins now have access to the WebSim API through the window.websim.experimental.v0 object. This means that WebSim simulations can now create other WebSim pages programmatically.
For example, check out this pluginified version of @vorps's WebSimTools that actually creates a new WebSim when you hit the save button:
Please note that the API is still in its early stages, so any feedback or feature requests are greatly appreciated!
WebSim - Intermediate Guide
Welcome to the intermediate guide on making requests and iterating in WebSim. This guide assumes you have a basic understanding of WebSim and aims to provide you with more flexible techniques for exploring the limitless possibilities of this alternative internet simulation.
Table of Contents
Flexible Request Formats
Iterative Refinement
Leveraging WebSim's Context Awareness
Refining and Retrying
Flexible Request Formats
In WebSim, you can utilize various request formats to generate and explore simulated websites. While URLs are the primary method, you can also use natural language to seed a website or iterate on an existing one. This flexibility allows you to express your ideas in a more intuitive and conversational manner.
1. URL-based Requests
URLs serve as powerful tools for shaping the simulated websites you explore. By constructing thoughtful and detailed URLs, you can guide the system to generate highly specific and immersive experiences. Here are some examples of creative URL structures:
These examples showcase the use of inventive protocols, hierarchical paths, and query parameters to generate highly specific and imaginative simulated websites.
Remember: You can use any combination of natural language, URL-based requests, and 'pseudocode' to be as vague or specific as possible in your requests. Don't worry if your URL syntax isn't perfect. WebSim's AI is smart enough to understand your intent and generate the desired simulated website, even if the URL structure is slightly unconventional. There's no wrong way to use WebSim – feel free to experiment and express your ideas in a way that feels natural to you!
If you're curious about the technical details of URL structure and syntax, check out our in-depth guide on URL structure and syntax for more information.
2. Natural Language Requests
In addition to URLs, you can use natural language to seed a website or provide further context for iteration. Simply describe your idea or the desired changes in plain text, and WebSim's AI will interpret and generate the corresponding website. For example:
Imagine a virtual museum that showcases the evolution of artificial intelligence throughout history, from early rule-based systems to advanced self-aware neural networks. The exhibits should be interactive and immersive, allowing visitors to experience the capabilities and limitations of each AI milestone firsthand.
WebSim will analyze your description and generate a simulated website that brings your concept to life, complete with interactive exhibits and historical context.
Tip: You can combine URL-based and natural language requests to provide even more context and detail for your simulated websites. Start with a URL to establish the basic structure and theme, then use natural language to fine-tune specific aspects or add additional features.
Iterative Refinement
WebSim encourages an iterative approach to refining your simulated website experiences. By building upon previous iterations and incorporating feedback, you can progressively shape the generated websites to align with your vision. Here are some techniques for effective iteration:
1. Progressive Elaboration
Start with a broad concept and gradually add more specific details with each iteration. For example:
Initial request: A website for a futuristic space travel agency.
Iteration 1: The space travel agency offers trips to various planets and moons within our solar system, with detailed itineraries and stunning visual previews of each destination.
Iteration 2: In addition to solar system trips, the agency now offers exclusive expeditions to nearby star systems, utilizing cutting-edge wormhole technology for faster-than-light travel. The website includes scientific explanations of the technology and its limitations.
Each iteration adds another layer of specificity and depth to the simulated website, allowing you to refine and expand upon your initial concept.
2. Branching Explorations
Explore different variations and alternatives by branching off from a common starting point. This can help you discover new possibilities and compare different approaches. For example:
By exploring different branches, you can delve into various aspects of a simulated website and gain insights into alternative approaches or focus areas.
3. Incorporating Feedback
As you explore the generated websites, take note of what works well and what could be improved. Use this feedback to refine your subsequent iterations by adjusting parameters, adding or removing details, or exploring alternative paths. For example:
Feedback: The virtual museum of AI evolution is informative but lacks a personal touch. It would be more engaging if visitors could interact with simulated AI agents from different eras.
Iteration: Incorporate interactive chatbots that guide visitors through the exhibits, sharing anecdotes and answering questions based on their respective AI paradigms.
By incorporating feedback and making targeted improvements, you can iteratively refine your simulated websites to better align with your goals and expectations.
3.1 Positive and Negative Reinforcement
The WebSim AI responds and remembers when told that something was done well or poorly. You can use this to make sure a certain element is preserved in future iterations, or that a type of generation will be avoided. For example:
Positive reinforcement: The interactive chatbots in the AI museum are a great addition! They really bring the exhibits to life and make the experience more engaging. Please keep this feature in future iterations.
Negative reinforcement: The wormhole travel explanations on the space agency website are a bit too technical and dry. Could we make them more accessible and visually appealing for the average user? Let's avoid this type of dense, jargon-heavy content in the future.
By providing clear feedback on what you like and dislike about the generated websites, you can guide WebSim's AI to better understand your preferences and generate content that aligns with your vision.
Leveraging WebSim's Context Awareness
WebSim is context-aware, meaning that the simulated websites you generate are influenced by your browsing history and the pages you've previously visited. This feature allows you to strategically navigate WebSim to a starting point that will help you generate the desired website more easily and effectively.
"Start small, and build up." When you ask WebSim to generate something, it generally goes for the path of least resistance. For instance, you may ask it to create a site off the URL https://soundscape.mediagenerator/customFXpack.installed=yes!&openMediaGenerator and it might generate something that looks perfectly functional, but lacks the background elements of what it is expected to do, and how to do it, and it may be challenging to get it to add these functions in after the page has already been made. For example, the page may generate sliders, but the simulated plugins you install use buttons as a function. As mentioned already, generating plugins pages, algorithmic plugins, etc. can help your current iteration context have the means to create what you are asking it to do this.
WebSim.ai Advanced Guide
Generated Backend
Generated Backends allow users to call on a simulated database in their websims. To use, type '/api/backendhere'. For example, for my Underground Martian Expedition I used '/api/martianplants'. When the user asks for a plant, it gives back a generated plant and its information from a simulated database.
Real Backend
WebSim allows users to call on functioning real world APIs. In this example, I asked my websim to use Leaflet's open source mapping software, along with OpenMeteo. I didn't even provide it a link, but it was able to properly find what it needed. The result was a worldwide map that could be clicked in any location in order to see its current weather.
HTMX Streaming
Using HTMX can allow your websim to process information without reloading the page. In my Underground Martian Expedition, I used HTMX so the user would be able to search plants without waiting for a full page loading sequence.
You can also use HTMX for live chatting with various LLM personas - a great example is Rudy's Boom Boom Room - Lightning Round by Jazmaan/OneMeatball.
In order to implement HTMX, simply tell your websim you would like to use HTMX. You can specify when, and where to implement, but it is generally not required.
Plugins
Plugins are a way you can add a functioning tool or site on top of another. By taking the string after /c/, or the full string after websim.ai/ for bookmarked links, you can add "?plugin=xyz" to any URL and combine your websims.
One important thing to note is that unlike context management, plugins do not get combined into your generation. They are designed to function on top of something, rather than as a part of it. A good example is found INPUTLINKHERE
Tip: Experiment with different plugin combinations to enhance your WebSim projects and create unique experiences.
Context Management
WebSim.ai provides powerful context management tools to help you maintain consistency across your simulated web universe.
Example: Use context variables to maintain user state across multiple pages in your WebSim project.
Note: Proper context management is crucial for creating cohesive, multi-page experiences.
!Continue
The !Continue feature allows you to expand and elaborate on your WebSim.ai creations, providing a way to generate additional content or functionality.
Example: Use !Continue to generate more articles for a blog or additional levels for a game.
Tip: Experiment with different prompts and instructions to guide the continuation process.
WebsimSockets: Understanding Websim's Multiplayer System
What is WebsimSocket?
WebsimSockets is Websim's custom multiplayer functionality that enables real-time communication between users within the same project. It's a specialized system that operates entirely within the Websim platform.
How It Works
WebsimSockets broadcast data to all clients connected to the same project
Each user is tracked using a unique identifier (UUID)
Data is stored and managed in project-specific databases
You can create single or multiple databases through prompting
Stores various types of data including user locations, media, and custom information
Features & Capabilities
Real-time data synchronization across all connected clients
Automatic handling of complex networking operations
Simplified API for managing multi-user interactions
Note: While WebsimSockets makes multiplayer development easier, networking is inherently complex. The system is designed to handle the complicated aspects of cross-machine communication automatically, allowing you to focus on creating your multiplayer experience.
Websim API: Complete Reference
Overview
The Websim API (v3.1.1) provides comprehensive endpoints for interacting with Websim's backend services. All endpoints are relative to the base URL: /api/v1
Key Features
Social Features (comments, reactions, follows)
Project Management
Content Access & Transformation
User Data & Statistics
Asset Management
Core Endpoints
Comments
POST /projects/{id}/comments - Create comments
GET /projects/{id}/comments - Retrieve comments
Reaction management via POST/DELETE endpoints
Social Features
GET /user/feed - User's personalized feed
GET /feed/trending - Trending content
Follow/Unfollow functionality
User stats and engagement metrics
Projects & Content
GET /projects/{id} - Project details
Revision management endpoints
HTML content transformation
Asset management capabilities
Data Structures
Rich text nodes (Text, Link, User, Site, Project)
Document structure (Paragraph, List, Block nodes)
Collection schemas for pagination
Standardized user and project schemas
Note: The API employs standardized response formats and error handling across all endpoints. Refer to specific endpoint documentation for detailed parameter requirements and response structures.
Language Model Integration Details
Current Implementation
Currently the Language Model (also known as websim.chat.completions) ability uses Gemini 2.0 Flash with no ability to change that model. This may change in the future.
Usage Limits
20 requests per minute, per user
Separate credit pool from daily site generation credits